
Introduction:
A false ceiling is an additional ceiling that falls beneath the primary ceiling. False ceilings are a low-cost, simple-to-install item. In this article, we will learn how to install a false ceiling by following a few easy steps. There are different methods of installing a false ceiling. Today we will discuss one easy method of creating a grid and simply placing the panels on it.
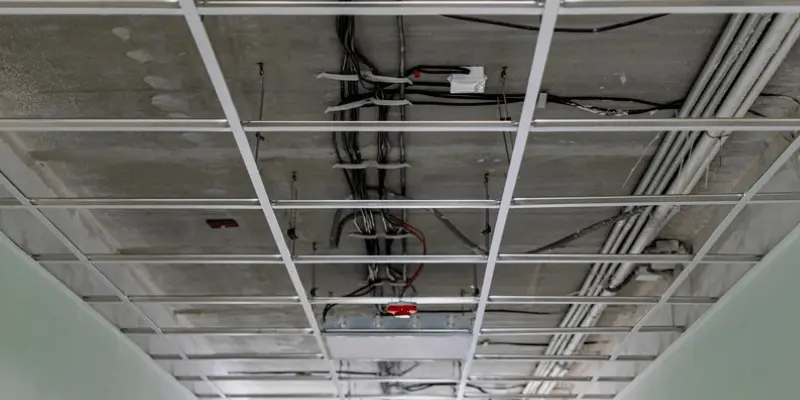
A false ceiling or a drop ceiling may conceal a wide range of faults and obstacles, such as pipes, cables, and ducting. The only downside of a false ceiling is you have to lose some ceiling height. False ceiling panels are available in different sizes. Pick the right panel size depending on your room area.
Follow these Easy Steps on How To Install a False Ceiling:
False ceilings are inexpensive, simple to install and enable you to readily access ducting and wiring after they’ve been completed. To put a false ceiling or a drop ceiling, you must first create a grid pattern of support to hold the ceiling panels.
Place the false ceiling boards in a position to form your false ceiling after the grid pattern is safe and protected. How to install a false ceiling? You must stick to a few simple steps below.
1. Take measurements:
Measure the length of each wall in the room where you’ll be installing your false ceiling. Write the dimensions of your space on the wall so you can easily reference them later.
Draw a line 4 to 6 inches down from the roof wall to determine your false ceiling height. This dropping is necessary to provide room for pipes, cables, ducts, and other objects. Draw a chalk line to make things simpler. Make your line 8 inches to 1 foot or more down if you wish to install a big duct or fluorescent light panel. Simply, your requirements decide the gap between the roof and the false ceiling.
2. Install wall angles:
Wall angles should be cut to the lengths of your walls. Wall angles are long L-shaped components that are used to support the tile runners on all walls. Wall angles should be cut to suit the lengths of your walls. You must adjust the corners where the two wall angles intersect. If your walls are longer than angles, join two of them together by matching the ends.
Now mark the stud position in the wall where you need to screw the angle. Find and indicate the stud positions at the angle on the wall. Match the top of the wall angle to the line you put on the wall.
Screws of the appropriate size and thickness should be used to secure your wall angles. To screw the studs in, you’ll also need an electric screwdriver. Check that your wall angles are level as you put them.
3. Install the runner of the grid system:
The primary runners should be cut to the space’s length. The primary runners will bear most of the weight of your false ceiling panels.
If the room is larger than the length of a primary runner, you may place connectors on the edges of the sections to join them.
To split your room, draw a chalk line or hang ropes every 4 feet (Here we are considering that the false ceiling panels sizes are 4ft x 2ft or 2ft x 2ft). Continue moving across your room until you reach the other edge.
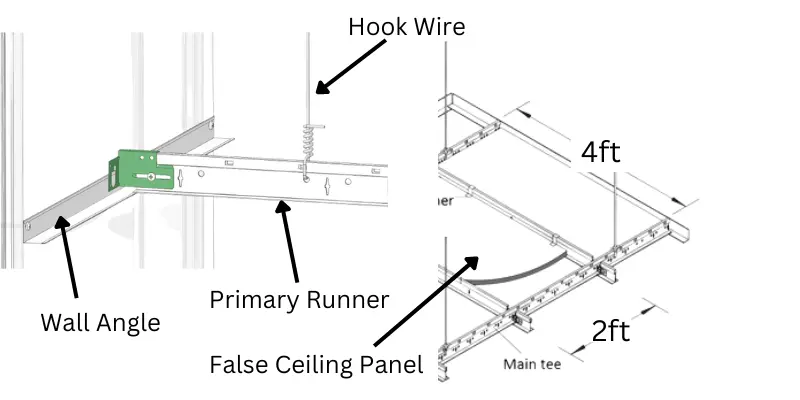
Following your line, drive a hook through a specific distance. An anchor hook is needed to be installed to hold the runner from the roof.
A piece of wire has to be placed into each hook. Cut a length of wire 8 to 16 inches long for each anchor hook, depending on how far your false ceiling hangs from the roof. The wire has to be put through the hook and bent after about 2 inches.
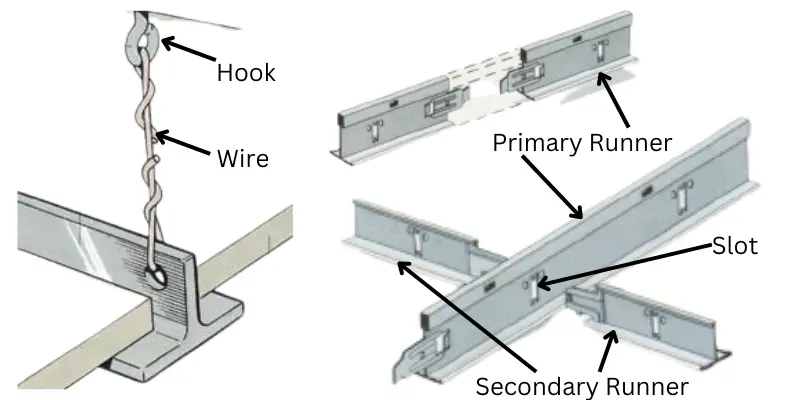
From the wires, the main runners need to be suspended. The runners must be installed with the ends resting on the wall angles that you installed in the earlier step. The other end of the hook wire should be placed into one of the runner’s circular slots and bent up. Each wire needs to be twisted around tightly to keep it in place.
Put the secondary runners in place so that they are perpendicular to your primary runners. The primary runners are positioned in slots that are every two feet. Secondary runners must adjust to the prime runner’s assigned slot. A grid is created when the secondary runner is positioned perpendicular to the primary runner, making it simple to install the false ceiling panel.
4. Install the false ceiling boards or panels:
If your false ceiling tiles size is 2ft x 4ft you can place it in the grid. Measure the perfect opening first. You may need to cut the sides of the panels for adjustment by using a utility knife. If your false ceiling tiles size is 2ft x 2ft you can place them side by side in a single grid.
Lifting the tiles through the grid will allow you to place them on top of the grid. Starting in the center of the room, go outward. Continue putting tiles into it until your ceiling is totally covered. The false ceiling panels may have a different size at one end of the ceiling than the others. Verify that every panel is precisely level.
Want cutting out for lights or other electrical fittings? Cut it as per your requirements.
Conclusion:
I hope now you get the easy answer to your question about how to install a false ceiling. This process may be different for metal ceilings, or wooden ceilings. That’s all about the installation of a false ceiling. I appreciate you taking the time to read the article.